Tuesday, November 10, 2009

K.O.T.D

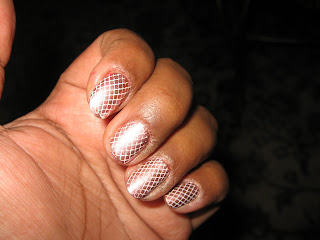
Today I would like to show you another of my Konad creations. Do let me know what you think...


For this Konad I used 2 layers of Sally Hansen's Buffed Sand which is a sheer brown and Konad's Special Nail Polish in Black.


This is the plate that I used - M9 - and the design is the one that is boxed in the image below.

Here is a closer look at the design and how it turned out so clearly on my thumbnail.


I had read on many websites that working with the Black Special Nail Polish can get a little messy and it is true. However, because I knew what to expect I was more careful and did not pick up a lot of color on the brush to cover the design on the plate. This helped as I did not get too much excess paint to deal with. The black color did stain one of my fingers and after a few washes, it came off so it was not much of a problem.
What do you think of this design dear reader?

E.L.F Elements - Custom Lipstick Compact

I really like compact make-up items which can be thrown into my handbag and this is one such item. This one was fun to choose because it lets you customise your colors and for the compact, plus the 4 colors I chose, I only paid USD 5 which is very cheap.
These three pictures show you the box, the compact and another view inside the compact. It looks sleek and opens and shuts with ease. There is a large mirror inside the compact which is useful if you don't have large mirrors around and need a quick touch up. There is a dual brush inside - a lipstick brush as well as an eyeshadow sponge tip and these will do in a hurry. This compact can also be used to house eyeshadow pans and thats why you get the sponge tip applicator as well.
These are the four colors that I chose:- wine, crimson, earth rose and peaches. They come individually and encased in plastic. All I needed to do was to take the pans out of the packaging and insert them into the compact. Each lipstick pan came with a little magnet on the back and on that magnet, there is a little sticker with the color indicated on it. How convenient!

I swatched the colors which I chose here for you to see.

The colors are creamy and sheer but buildable. If you need average coverage and a sheer wash of color then these would suit you. I tried wine, crimson and earth rose, all of which I like however, the colors do not last very long and have a tendency to disappear on your lips if you just use one coat. My upper lip is darker than my lower lip and I do have problems trying to even out the colors so I prefer deeper colors or deeply pigmented lipsticks that can even the color on my lips. These 4 colors do not do that for me. So, on days when I want to be a little casual and just need a wash of color on my lips, then I reach for these.

Now, lets talk a little about the fourth color, peaches. I am sure you are wondering why I picked such a light color. Peaches looked sweet on the online store and I believed it to be a little pinker than what you see in the picture. However, this was not the case. Nevertheless, I can still work with this color as can all of you ladies out there who find that they bought the wrong color.

Firstly, you can mix it with some other color and get something totally new. Secondly, what I do is once I have used a color on my lips, I take a light color, like this one and apply it to the pout of my lower lips, right in the middle. It gives your lips more depth and shine and makes it look fuller. Of course, the trick to this is blending until the color is even. Thirdly, swap with a friend who you know the color will suit! And fourthly, we all make mistakes and thats how we learn what is and is not right for our skintone and coloring. So make a mental note of the color and swear never to buy anything like it ever again!

Monday, November 9, 2009

Where Do I Store My Stuff?

ParisB from Mywomenstuff had recently shown you her storage space and she encouraged us to show ours as well. Thus I have taken some photo's of where I store all my stuff for you, my dear readers, to see.

One hot, sunny afternoon, I decided that I needed someplace to store all my beauty stuff as my dresser was heaving under the heaps of products and I dragged my wonderful husband to Carrefour to look for some storage ideas. I must pause here to say that in all my crazy endeavours, my husband has stood by me and is my greatest supporter. He was amazed that I wanted to start a blog, is blown away that I am so heavily into all things beauty related and is enthralled by my Konad adventures! He says, my day job in the high flying corporate world is such a contrast to my 'other' side!

Anyway, I needed a man's point of view on whether the shelves, storage drawers and other whatnot that I needed would fit into the space between my dresser and the wall. So with a measuring tool he looked really professional as he was measuring the amount of space I had to work with and once he had the necessary information written down, we headed off to Carrefour. (Men! you've gotta love them!).

I found this amazing storage sheves which fit perfectly into the space I had and had wide enough space to fit whatever I had plus some for 'future purchases'! Lovely!

Let me explain the things that you see in the picture above.

On the topmost shelf, I have two clear cookie containers of different heights (recycled from a Hari Raya hamper that arrived at the office), in these, I have my brushes (the taller container) and in the shorter container, my hubby's hair gel and deodorant (that's all he needs apart from his perfume!!!). The basket sandwiched in the middle there has some tools such as lip balm, night cream for face and eyes, toner, my deodorant, bottles of foundation which could not fit into the drawers and cotton pads as well as q-tips.

The big set of drawers on the top houses from top to bottom:
  • Drawer 1: Miscellaneous samples of different products.
  • Drawer 2: Extra Sponges.
  • Drawer 3: Round cotton pads to use with toner or for removing make-up/nail polish.
  • Drawer 4: Moisturiser and fine milled facial powder used to set make-up.

I also purchased the smaller blue drawers that you see on the second shelf and they fit these things:-
  • Left Drawer 1:foundations, liquid (decanted to smaller pots) and powders, concealers, and some triangular sponges that I use for liquid foundations.
  • Left Drawer 2: Eyeshadows (my everyday ones).
  • Left Drawer 3: Mineral eyeshadows and some shadows that are rarely used.
  • Right Drawer 1: Blushes
  • Right Drawer 2: Eyeliners (liquids, gels and pencils) and mascara's.
  • Right Drawer 3: Lipsticks, glosses and lip pencils

The black square case that you see stuffed in the second shelf houses some extra products or new one's which I have yet to use. That case came from Estee Lauder and I bought a set of make-up items that came in that case. I didn't care much for the shadows and brushes that came with the set (gave them to mum) but the case was good for more storage!
Right at the bottom, I have a container which I purchased at Carrefour which is commonly found in the hardware department as it is used for storing nails and such. I found that the compartments were perfect to store my jewellery, such as chains, earrings and rings which I have purchased or were gifted to me over the years. I have a passion for large and unique looking rings which I use as statement pieces occassionally. I do have many chains which I rarely use. I just am not into them right now. I do not store gold or my pearls here - they are in the bank.
The last shelf also has my hairdryer which is convenient because there is a powerpoint just below the shelf. This shelf is perched on a stool which came with the dresser, but I dont use. This gives me easy access to all the three shelves, and I also have space underneath the stool to put in a small bin for my used cotton or tissues etc.
Here you can see my dressing table and the stuff that sits there now! My favourite perfume is Petit Cherie by Annick Goutal - I love its floral and summery smell.
Well, I hope, dear reader that you had a good time looking at my storage space.

KOTW - Konad of the Week!

Hello dear readers,
I have yet another Konad to show you and I am really having a fun time with my Konads, I must say!


I have called this the "Mehendi" or henna tattoo Konad because I chose the maroon Konad Special Nail polish on nude nails for this and I used Plate Number 9 - the image is the one to the left of the 'belt' image.


After I had done the image and put on a clear coat of polish, I thought that the nail looked plain and so I added a bit of brown glitter to the tips. I must admit that I took these photo's close to a week after I had done the nail so the tips were beginning to show some wear and tear.
I am by no means good at this yet but I do hope you enjoyed looking at the pictures!
Have a lovely day!

ELF Haul!


Not too long ago, I purchased these E.L.F beauties from an online spree. If you have come across Lowyat.net you would have also seen something labelled "Stuff for the Ladies" and mighty interesting stuff can be found here let me assure you! One gem is a seller called sgdrugstore. This is a seller that is reliable and well recommended by blogger Connie of Skindeco - you can read her review of Ryan who is the brains behind sgdrugstore here:- http://www.skindeco.net/2009/01/seller-review-sgdrugstore-from.html


Quite a bit of a haul as you can see from the picture above and it took only 3 plus weeks to arrive at my doorstep! The total cost of my haul came to only RM105 and postage was waived because my purchase exceeded RM100.


E.L.F stands for Eyes, Lips, Face and this brand has a range of products that cost only USD1! How can you beat that? They also have a 'Studio Line' that is priced at USD3 and is another winner according to some reviews online. All the products you see in the picture above are from the USD1 line. I will be reviewing these products in the coming posts so do look out for them.

Monday, November 2, 2009

TNOTD!


I thought you should also see a ToeNail of the Day! I am Toe'Nading now!


This is not the clearest of pictures as it was taken using my mobile phone. I used the M41 plate you see above with a design that fit nicely on the top corner of my toe. Its the design right above the butterfly. I don't remember now, but the polish I used would have been one from Maybelline.

I cannot tell you how much I enjoy having designs on my fingers and toes. Its like having a secret and keeping it with you. I delight in looking at them or if my shoes are totally covered, I get a little buzz of happiness just thinking that my toes are all pretty inside my shoes. I feel sexy too. Its like a little pick me up when I need it to get me through the day! Hope you enjoyed my Toe'Nading!

Konad Crazy! My First NOTD!

I have been indeed a happy camper these past few weeks. Remember my Konad haul? Yep, my introduction to the world of Konading came via PrettyBeautiful and her NOTD's. I was so fascinated by Konad that I went out and bought the stuff. I had read that Etude House (Bukit Bintang) and InQBox (1Utama) carried them and initially made my way to EH to check it out. Sadly, they carried limited plates and were out of the stamping tool when I was there. I then purchased the stamping tool as well as the special nail polishes from http://konad.com.my/ and two (yes! just two) days later, my products arrived!

I must say, my intial excitement was met with disappointment when I was unable to stamp the beautiful designs on to my nails as easily as I had seen them being done on youtube! It was really strange because the first image usually transferred nicely but subsequently they all never came off the plate on to the stamping tool! I was stumped. I tried everything.....to stamping without the fan switched on to pressing the stamper really hard to pick up the image....nothing worked! I am not one to give up easily so I left the stuff aside for a couple of days and started to do my research on the net on how to get around this problem. I sent prettybeautiful an e-mail which she replied with useful tips and I also looked for videos online for help. Here is what I found:-

Casual Lavish has a good tutorial with plenty of tips here- http://www.youtube.com/watch?v=XWDsEyS8nPs and together with prettybeautiful and her tips, I was successful in learning how to do it correctly.

For those who are starting out, a few key things to remember are:-


  • filing the stamping tool with a fine nail file before you begin using it - this is particularly helpful if the tool is too smooth and is not picking up your design.

  • ensuring that you do not touch the image plates with your fingers, as the natural oils may get in the way of the design sticking to the stamper


  • using nail polish that is 100% acetone or one that does not have moisturizers that could introduce oils to the image plates/stamper

So, now I would like to introduce you to my NOTD!


For this look I used a pinky brown nail color from Bloop de Paris and topped it off with a design from the M57 plate you see above. I was really happy with the outcome as I had been trying really hard for some weeks now to produce something worthy for my readers (hey MOM!!) to see. I hope you like it and I hope to do more NOTD's.