Monday, February 14, 2011

FAKES at SASA

Readers, I nearly suffered from whiplash as I did a double take while shopping at SASA (Sungei Wang Plaza, KL) recently. I stumbled upon a set of brushes which looked totally like some other brand and when I looked closely.....the brand name was not the same.

Check this out! Its called Fenling - Made in China. AND the resemblance to the original is astounding right down to the string used to tie the brushes together! Just below the brand Fenling are the words Earth Friendly Beauty (it is not clear in the picture).

I managed to dupe the SA into thinking I was looking to make a phone call on my phone and distracted her with questions about another product in a different aisle before I quickly took a picture.


Compare that up there to this down here. The ORIGINAL Ecotools. Same right?

It really upsets me that these stores have resorted to selling fakes so blatantly. Next time you pick up what you think is Ecotools at SASA....look again, you could end up with Fenling and the guarantee of soft eco friendly brushes may not be true.

Friday, February 11, 2011

Blue and Purple Eye

For some reason I have been craving blue and purple makeup. So here is an eye look I did with yellow gold in the inner corner into blue into purple and into darker purple with a touch of black. There seems to be a greenish cast on the crease but I did not use any green at all.

I created this look using the Coastal Scents 88 palette. I primed with MAC's Painterly. The eyes were lined with IN2IT black liquid liner and Loreal Ultra Volume Mascara was used on my lashes. Seeing that it is so fierce, it would be wise to keep the rest of the face light!

Have a great weekend y'all!

Wednesday, February 9, 2011

Review: Maybelline The Magnum Volum' Express Super Film Mascara (what a mouthful!)


This mascara practically barked at me when I walked past with its bright yellow packaging and bold red words declaring what it can do for lashes. Being the sucker that I am, I picked it up immediately of course.

Its not pretty and luxe looking, the packaging, yet there is something about it that made me want to get it and take it for a spin.
Maybelline The Magnum Volum' Express Super Film Mascara promises a few things, volume (minus the clumping), long lasting wear (up to 24 hours, it seems) and easy removal (use warm water and BAM....gone!).

Volume

I was not blown away. I think my lashes are quite full and hence what I look for is a mascara that can make them look nice and thick with just one coat. I normally do not put on more than one coat on work days as I do desire that clumpy effect and I do not have the time to use a lash comb to separate them in the mornings.

Look at the brush from two different angles. To me this sort of gave me hope that my lashes would come out very thick and curled. Unfortunately I did not experience that.


Let me tell you how I apply my mascara. I apply one coat on top of my (upper) lashes and another coat on the underside of my (upper) lashes and that’s how I do it. Sometimes I will use two coats on the outer corner of my lashes. To get a nice wispy effect and add more definition to my eyes, I do make an effort to attack the lashes on the outer corner of my eyes. For me, those couple of lashes out there are easily missed and I need to move my hands and head this way and that to ensure that they are coated too. 

Very rarely do I apply any on the bottom lashes as my bottom lashes are long and I tend to get mascara all over that area if I try to be a hero and apply it there.

As for the inner corner of my eyes…..I pretty much leave them alone too. After trying many times to coat them as best as I can without (a) poking my eyes with the mascara wand (b) poking my nose with the mascara wand – I do have a high bridge on my nose! (c) smudging mascara all over the inner corner of my eye, I gave up as this would have resulted in me having to take the morning off work trying to get the smudges off! All three options are not at all appealing so I leave the inner lashes alone.

I only use two or more coats if I have a special occasion to attend and want to wow everyone with my super long (natural) lashes but then again....they have invented falsies for that bit of cosmetic deception! 

So back to the verdict on Volume - most mascara's out there do have volumizing effects and give better results. This one is just so-so.


Long Lasting Wear

I am blessed with slightly upturned lashes and always notice that my lashes do not droop despite reading this gripe from many other bloggers out there. Some mascara’s curl my lashes more and some keep my natural curl but I have thankfully not come across one that causes my lashes to droop. Perhaps it lies in the way I apply mascara - I really wiggle the brush all the way as close to the waterline as possible upwards. I also do it in sections – once close to the inner lashes, once the middle lashes and lastly once on the outer lashes.

As far as lasting wear is concerned, for my eyes, this lasts and don’t droop on me at all.

Easy Removal

Love how easily I can wash this off with my cleanser! I dislike the waterproof one’s where even a facial wipe soaked with oil remover does not remove all traces of the mascara and I have to practically triple wash my eye area until it becomes rather sore. Washing once is good enough if you have a great cleanser. Using facial oil to remove all traces of makeup prior to cleansing is good too but having to wash twice and still not get all traces of the mascara off really upsets me. I hate that heavy / clumpy lashes feeling when I don’t get it all off after washing!

All in all I think this is a cheap and good mascara for light day wear – I would definitely use more coats or use a different brand of volumizing mascara altogether for a thicker, fuller look for evenings.  

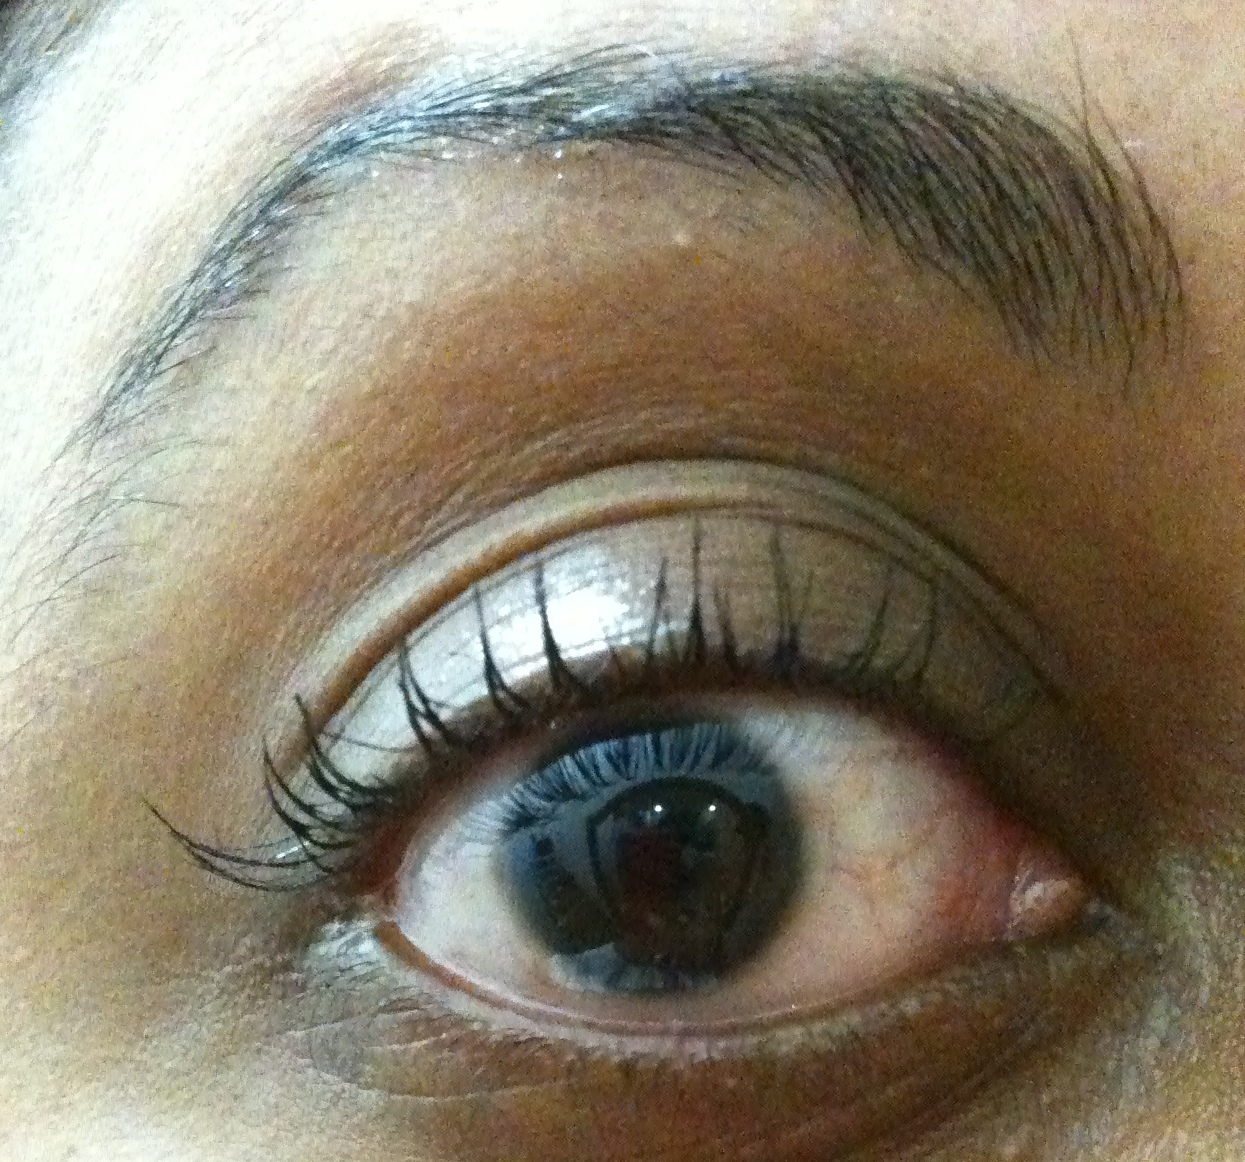
Here is the before leashes:-


And these are the After lashes:-

Quite curly and this curl holds until I get home after work....so on that count alone its pretty good for me.

Tuesday, February 8, 2011

My Top Beauty Picks of 2011!

Here are some practices I started in 2010 and am continuing through 2011 and beyond. These are items which have become entrenched in my beauty routine now and I cannot do without them.

Meet my not so new friends – NYX Eye Shadow Base and Smashbox PhotoFinish Primer. These are the two additions to my beauty steps prior to applying makeup.

I love NYX Eye Shadow Base for the lasting power it gives my eye shadows and now I do not have to worry about that ugly oily crease that I get in my eye socket by midday. I used to be so self conscious about it and sometimes when I am busy at work and forget to check, I wonder how others would have felt when they had to look at the ugly light brown line on my eye where the oil had its way! Not any more…..i wonder why I did not discover this earlier, because it certainly has been a wonderful product. Initially I was skeptical as to whether this product would deliver as even though I had heard about Urban Decay’s Primer Potion, I had not come around to purchasing it due to the numerous complaints about its seemingly flawed design. There were hundreds of YouTube posts on how to depot what was in the cute bottle and that scared me a little, I must admit.

Well, the NYX ES Base indeed was a little surprise in a pot for me as the payoff was good, bright colors and most important of all, super staying power. Even when I walk out in the sunny heat for lunch, my eye does not get that oily crease-y gunk that looks terrible. I cannot say enough about how much I love this product.

When I finally got round to purchasing Urban Decay’s Primer Potion, I did not use it as much as I do my NYX. I have also (albeit, a little unfairly) not given it a spin and put it to the 12 hours and above test like my NYX. I guess I will have to get round to doing that soon and when I do, I will let you know how that went. In fact one day I am going to use UDPP on one eye and NYX ESB on the other and put it to the test that way!!

My other makeup staple now is the Photofinish Primer by Smashbox….which they have thankfully also repackaged! The old packaging was terrible and until this day I have not figured out how to get the last bit of Primer out of that damn package! I love how my face looks and remains fresh throughout the day with the Primer on and it really controls the oily shine that is so unsightly. I still need to pat my oily face with a tissue or Blotting papers after lunch everyday but even if I forget, the oil does not shine like a beacon on my face!

Another good substitute for this Primer, if you are a beauty on a budget is Monistat Chafing Gel. It is just as good as the Smashbox version only cheaper. I do use both interchangeably without preference for any one. I think Smashbox is slightly better at controlling my oiliness but just marginally so. I do not think Monistat can be purchased here in Malaysia (at least I have not seen it in the shops) but there are some online spreer’s that will be more than happy to purchase it for you.

Apart from these, I am also more aware of the need to exfoliate regularly and I use Clinique’s Exfoliating Scrub every two or three days. The grains in this gentle scrub are not abrasive and can be used often. It is 100% fragrance free and its top ingredient is water. I never realized how my pores can get clogged and thus resistant to absorbing all the good and expensive products I have bought for my skin until a recent experiment done by my favorite SA at Clinique (Pavilion). She cleansed my cheeks – one side with cleanser and the other she used the Exfoliating Scrub. She then applied my moisturizer on both cheeks and asked me to feel which side had absorbed the moisturizer best. Lo and behold it was the cheek that had been exfoliated that had completely absorbed the moisturizer! That side of my cheek felt smooth and satiny. The other side was still a little damp with my moisturizer just ‘sitting’ on my skin and after some vigorous rubbing, I then felt that the moisturizer had been absorbed. That too not as fully as the other cheek that was exfoliated.

We may sometimes think we know so much about makeup but there are still some tips and tricks we can learn that will benefit our skin greatly. It is one thing to talk about the benefits of doing something or using some product but until we experiment and see the results for ourselves, we will never know. So do try this little experiment for yourself with whatever Exfoliating Scrub you currently use and then see how well your moisturizer is absorbed. For my face, I have to exfoliate every three to four days in order for my moisturizer to properly be absorbed. The environment we work in also plays a big part in clogging our pores. A cleanser alone cannot wash away what is deeply embedded in our pores and the dust (heat and dust are our greatest enemies when it comes to clogged pores and being in the tropics, we cannot run away from these two things). So, surprise, surprise, our cleansers do clean what lies on the surface but a thorough exfoliation or even a deep clay mask will do the trick of cleansing from deep within.

What are your must haves for 2011 dear readers? Have you discovered a tip that was interesting? Do share!

Thursday, February 3, 2011

My First Eye Look Using UD Naked Palette


This is my first look created using the Urban Decay Naked Palette! I love the colors so much and I knew exactly which colors I wanted to rock this morning! Nope....I had nowhere to go and nothing to do, but I so much wanted to play around with the colors that I spent half an hour just doing my eyes. Another first if you did not already notice, I have on falsies!!! My first time using false eyelashes. I am indeed proud of myself. Not a look you want to sport to the office....well you could, if you toned down the eyeliner and left out the falsies.

Here is the complete look. I started off by priming the eye lids with my NYX Eye Shadow Base, which I think is comparable to the UD primer potion. I have worn eye make up with this as a base for 12 hours straight and it looked as fresh as it did when I put it on.

 Take Virgin and lay some down on the inner corner of the eyes as well as on the brow bone to highlight. I could have used more on the brow bone - I failed to realise that once I was done with the look, Virgin had sort of faded a little with all the buffing and swirling.
Then take Sin and use that all over the lids going up to just below the brow bone. After that, tear off a small piece of sticky tape and angle it on the outer corner of your eyes to achieve the cut crease look. (Many tutorials of the cut crease are available on YouTube, please watch those to get an idea of how this is done.) Make sure you take off the tackiness of the sticky tape on the back of your hand prior to using it on the outer corner of your eyes. Once you are happy with the placement of the sticky tape, take a small fluffy brush and apply Half Baked on the middle of the eyelid. You don't need to go all the way to the outer corner of the eyes but concentrate on the middle of the lids.

On the outer corner use the same small fluffy blender brush to pick up Hustle and apply going from the sticky tape towards the middle of the crease of the eye. Pick up a little more of Hustle and repeat until you get the density that you are happy with. I also took a small amount of Creep and concentrated on the outer corner to give it a little more definition.

Then use Zero to line the upper eyelid and Whiskey to line the lower lids. I used Sidecar  with a pencil brush over Whiskey to make the color pop...but I don't think I used enough as I could not see it clearly in these pictures.

Over this I added my False eyelashes. These are from Taiwan and look quite pretty and natural. I had to put on a thick layer of Liquid Eye Liner - Cyber Color in Black, to mask the glue line of the falsies. I did not quite get the falsies to stick nicely so if you note that in these pictures, please forgive me. It is my first attempt after all!

Hope you like this look - my hubby said I looked like a Geisha with my fluttery lashes!!

Wednesday, February 2, 2011

Dupes for the Urban Decay Naked Palette

Here it is for all you dear readers out there who are wondering whether to purchase this magnifisome (magnificent and awsome rolled into one) palette. Personally, you should splurge on the Urban Decay palette and keep it in your stash for I guarantee that this is the one palette you will be going to over and over again for all sorts of looks. If you are into smoky, sultry looks or even something toned down for the office, this is a sure winner. I am thinking of buying another one of these as a backup - THAT'S how much I love the colors!!

In a rather primitive way, I have swatched the colors on a piece of paper and swatched both the original and the dupe alongside each other. The good news for you is that most of the colors can be found in the Coastal Scents 88 Warm palette. Two of the colors I have taken from the Coastal Scents 88 Eyeshadow Palette. So if you do have the 88 Warm palette, then you are indeed in luck and can get your fingers stuck in with creating the numerous looks possible with these colors. Humbly I submit that these dupes are colors that I found which look as close or close enough to the original UD Naked Palette and if you have the same palette and feel that there are other colors which are a closer match, then please do let me know.

What you see here is the Urban Decay Palette on the Right and the 88 Palette on the left. I believe that the colors are quite a close match and you will be able to get a similar effect layering the 88 palette to get a deeper color. I have only used my fingers for the swatches and as some of the UD colors are shimmers, the camera does not pick that up very well. I will let you know how I referenced the 88 colors below as these colors have no name.


What are your thoughts on the dupes? Quite amazingly similar right? The colors that were the most difficult to find a match for in the CS palettes was Half Baked and Gunmetal. Half Baked is in two words:- liquid gold! It is quite hard to replicate that and I am thinking of  MAC painpots in Bare Study or Cash Flow as good dupes. The Gunmetal dupe had a slight greenish tint which was not present to the naked eye prior to swatching. As for Darkhorse, the color is pretty spot on if you layer it a few times. My swatch was just two swipes in the picture clearly not enough to get the deep chocolatey goodness of the original.

If you are interested in trying out the Naked look and do not already have the palette because it is sold out or yours is on the way or even if you are just curious as to what the hype is all about, then do give these colors from your 88 palette a test drive and see if you like them. You might just be convinced to get the original to keep after you fall in love with the versatile looks you can recreate!

So if you see the swatches of the 88 colors above, you will notice that they are referenced this way:- 3/3 W or 10/2 ESP. 3/3 means the third row from the left and the third color down. The 'W' or 'ESP' after the number reference is 'W' for Warm and 'ESP' for Eye Shadow Palette. The palette you see directly below here is the Warm Palette which is where the majority of the dupes are found. The palette below that is the Eye Shadow palette with its mixture of brights and browns.


The 88 Warm Palette from Coastal Scents

The 88 Eye Shadow Palette from Coastal Scents
I do hope that these dupes have inspired you to find similar colors for the UD Naked palette in other brands. I know MAC has some dupe-worthy colors that you can use as a substitute for some of the colors in the Naked palette. What is important is that you are not restricted by just the colors of one brand - even if there is a huge cult following sometimes, it is just as fun to walk on the wild side and see that colors, as varied as they are, do still have similar undertones and can be replicated successfully. Have fun!

Konad: M65 Design with French Tip

It has been so long since I attempted to Konad because, my nails were not worthy of polish or paint due to how brittle it was and how easily it broke. I have been taking Biotin supplements alongside my usual vitamins and I must say my nails are looking much better and stronger now. Another problem I have is dry and scaly cuticles. My cuticles grow very quickly and become rough and hard causing me to pull and peel at them - bad right? I'd like to think that I have kept to my resolution this year which is to take better care of my nails and cuticles. So I present to you my latest Konad adventure.

For the design you see above, I primed my nails by giving them a clear coat of Sally Hansen's Hard as Nails and then used one coat of light pink natural tone from a Sally Hansen French Manicure set. 
I then took out my M65 plate and chose this design - you can still see the white Konad Special Nail polish that I used for the design on it! I transferred this design as best as I could placing it on one side of my nail and stamping it all the way to the other side.

For the white tips, I free handed the French design on my nail tips with the white polish you see above and set everything again with Hard as Nails. I stamped the nail design first and then did the french tips for a neater look. I was quite pleased at how my french tips turned out seeing that I could not for the life of me pick up the french tip design on my Konad plate. It came off in bits. I also did not have any nail tip stickers with me for the french tip so a freehand was what I settled on and it turned out ok.


This look lasted one whole week with light washing involved so it is really worth the time and effort you take to use a top coat and Sally Hansen's Hard as Nails, really deliver. Make sure you also coat the edges of your nails and the underside with the product to ensure that everything is well protected!

Totally Naked with Urban Decay's Naked Palette

Surely you have seen it and love the colors right? Urban Decay made half the ladies of the world go ga-ga over this much anticipated palette and judging by the inability of the stores to keep this on their store shelves, everybody is truly loving this incredible palette. The colors are also super sexy and best of all, you don't have to keep this in the drawer to be pulled out for evenings out but rather, many of the colors are well suited for day looks. Just check out the many video's on YouTube on how-to's. I promise to show you a look or two using these colors in the very near future and if you are darker skinned, you will be able to appreciate how these colors look on your skin.

I was in Singapore late last year and called up Sephora to check if I could come and get one and I could hear the SA on the other end laughing in an evil high pitched laugh before she said "No chance of getting one...we don't have stock now and the last batch sold out in seconds!" What to do but book via a spree on Lowyat.net early this year and as I am writing this, I am gently stroking the lovely velvet cover of my palette! Yay!

I must say that the day I received my palette, I spent 25 minutes just staring at how lovely the colors were as I sat by my window......this is well and truly the mother of all neutral palettes and I can really understand why everyone is crazy over it!

As you can see above, this palette came with the 24/7 Glide On Eye Pencil in two colors as well as 3.7ml's of the Primer Potion (below). The only complaint I would have is that the Primer Potion is still in it's old packaging and I guess I would have to depot this once the bottom bit cannot be accessed but thats another story altogether.

  
 These are the swatches of the colors on the back of the box.


 The amount of product you get is 1.3 grams per palette which is plenty of color and real value for money.


Even though you have probably seen many swatches, the difference here is that it is on my skin and if you are curious to know what these colors look like on olive/dusky/Indian skin then scroll on.


If you ask what my favourite colors are, I must say Sin, Halfbaked, Toasted and Hustle. A lot of the colors have pinky undertones to them and are workable on every skintone. Buck is very close to my skintone and seems to disappear as you can see above. Halfbaked is like liquid gold with a yellowish undertone and will be gorgeous on dusky skin. Smog and Sidecar are also worthy of a mention for being bronzily beautiful.

These are the swatches of the eye pencils, one half is a black called Zero and the other half a browney bronze called Whiskey.

After looking and thinking about the colors, I realized that not all women out there will want to shell out plenty of money for this palette - cult following nonwithstanding. Fret not for there are respectable and affordable dupes out there which you can use and pull off a decent look. I found most of the dupes in the Coastal Scents 88 Warm Palette as well as in the 88 Eye Shadow Palette. These I have kept for another post and once I sort out the pictures I will post that so you can do a whole look with similar colors. Perhaps Sidecar and Halfbaked were the biggest challenge to dupe but there are very close matches for both in Coastal Scents 88 palette.

For those of you who are celebrating Chinese New Year - Have a prosperous start to the Year of the Rabbit!